In this article, we will go through the process of installation of Magento 2 with Elasticsearch in Localhost utilizing Xampp on Windows. This will be magento 2 install command line.
With the arrival of Magento 2.4.6, things have gotten more earnestly as Magento 2 currently, requires Elasticsearch as a compulsory part.
Magento2 depends on Composer, Elasticsearch. So to install Magento2, we first need to install these. This will help you to install Magento2.4.6 or Magento2.4.6-p1 or Magento2.4.6-p2 on your Windows machine.
Requirments

Note- Please use elasticsearch 7.16 for magento 2.4.6
This installation process is explained step by step in this article, so follow it while reading.
The following are the contents-
- Step 1: Install Xampp and Configure php.ini
- Step 2: Install elasticsearch on Windows OS
- Step 3: install Composer (A Dependency Manager for PHP)
- Step 4: Create database for Magento
- Step 5: Install Magento 2.4.6
- Step 6: Install sample data for Magento 2.4.6
- Admin Login
- Summary
Step 1: Install Xampp and Configure php.ini
Our first step to install Xampp as it has PHP, MySQL, Apache installed in it. These are required to have Magento2 setup on Windows
Download and install Xampp
https://www.apachefriends.org/
Configure php.ini
Before we will install Magento 2, make sure to install and enable all required PHP extensions and configure some PHP values to make the installation go smoothly
Enable required php extensions
As stated in Magento 2.4 system requirement, we need to install and enable the following php extension
| bcmath | ctype | curl | dom |
| gd | hash | iconv | intl |
| mbstring | openssl | pdo_mysql | simplexml |
| soap | xsl | zip | ext-sockets |
On windows OS, all the extensions are automatically and periodically compiled by the PHP Group. You just need to enable these required extensions in php.ini
Go to C:\xampp\php\php.ini
Quick tip: You can quickly open php.ini on Xampp interface with this button

Enable PHP extensions & Configure php.ini [PHP]
Enable below extensions in the xampp/php/php.ini file:
extension=gd
extension=intl
extension=soap
extension=xsl
extension=sockets
extension=sodium
extension zip
Change the limit of below keys in the xampp/php/php.ini file:
max_execution_time=18000
max_input_time=1800
memory_limit=4G
These values will keep the installation go properly without interruption.
Finally, restart apache to apply php settings by click on apache Stop and Start button on XAMPP
Step 2: Install elasticsearch on windows OS
Elasticsearch is now a required application to install Magento 2.4. During installation process, the system will verify if Eleasticsearch was installed and configured properly. If there’s something wrong with Elasticsearch verification, the installation process will stop.
Download Elasticsearch for Windows here: Click Here To Download Elasticsearch here
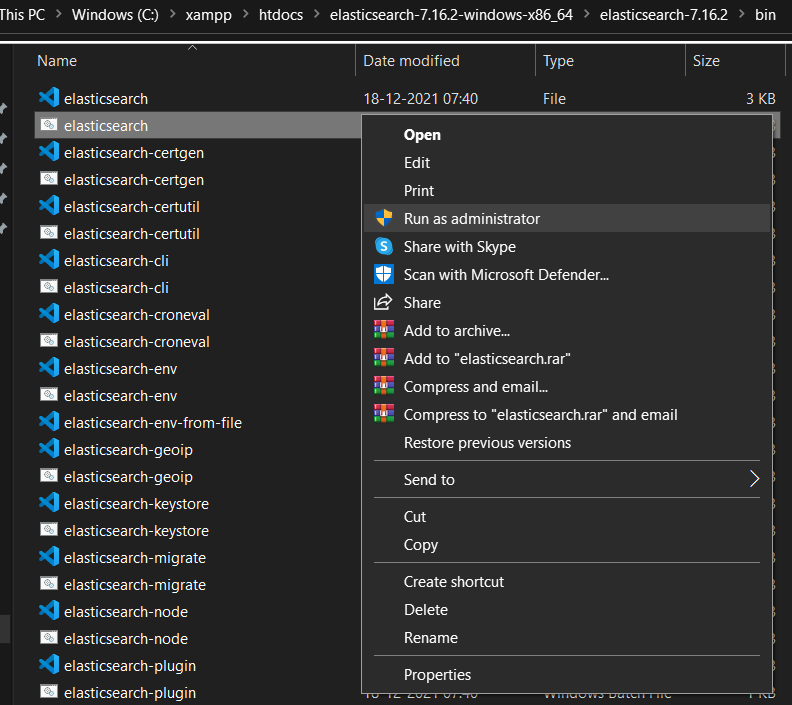
Next, unzip archived file at the “C:\xampp\htdocs\” as shown below and go to \elasticsearch-7.16.2\bin
Right click on elasticsearch.bat and select run as administrator
To check if Elasticsearch is running on your system, in your browser type: localhost:9200
If you see this result page => Elasticsearch is running properly

Step 3: install Composer (A Dependency Manager for PHP)
Now we will install Composer on localhost.
Composer is a library management tool in PHP (Dependency Management), this tool saves us a lot of time with the necessary packages that your project needs to use, you just need to declare it, Composer will automatically download the code of the libraries through a community server.
>Download Composer Windows version here: https://getcomposer.org/Composer-Setup.exe
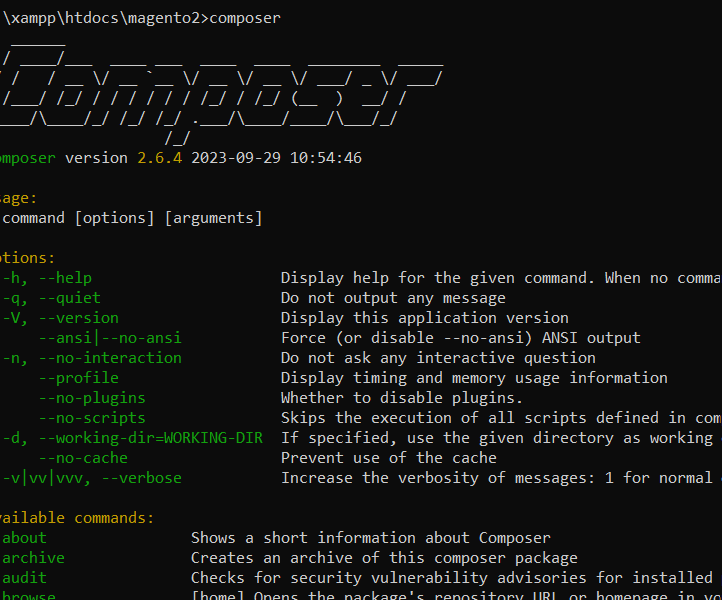
Now we will verify if Composer was successfully installed by opening Windows Command Promp and type composer . If the command prompt screen returns this outcome > Composer was installed properly
Step 4: Create database for Magento
Before we process the installation, we have to create a database for Magento 2 website to store all settings related to products, catalog, users, store configuration….
In Xampp interface, open PHPmyadmin by clicking on Admin button to open phpmyadmin (you can also type: localhost/phpmyadmin/ in browser to access phpMyAdmin)
On phpmyadmin page, click on New => type database name => click on Create to create a new database.
Step 5: Install Magento 2.4.6
Now every preparation steps are done and we can start installing Magento 2 on Localhost.
In command prompt, cd C:\xampp\htdocs,
Run below command
composer create-project --repository-url=https://repo.magento.com/ magento/project-community-edition magento2
NOTE- magento2 is a folder name where you want to clone all files
Now, see the magento2 folder with all files and folders. Now Open Command Windows and type cd C:\xampp\htdocs\magento2

Server configuration
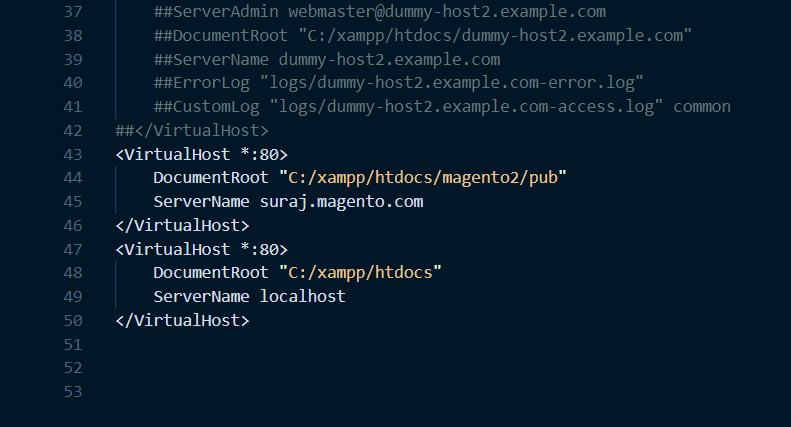
We need to set document root to pub, to do this go to file C:\xampp\apache\conf\extra\httpd-vhosts.conf
Add this content in the bottom of the file.
<VirtualHost *:80>
DocumentRoot "C:/xampp/htdocs/magento2/pub"
ServerName yourname.magento.com
</VirtualHost>
<VirtualHost *:80>
DocumentRoot "C:/xampp/htdocs"
ServerName localhost </VirtualHost>
lets open C:\Windows\System32\drivers\etc\hosts file in notepad and add the below line at the bottom of the file.
127.0.0.1 yourname.magento.com
Restart apache to apply php settings by click on apache Stop and Start button on XAMPP
Now insert this command to start installing Magento 2 (make sure Elasticsearch, Apache, Mysql all are running before execute this command)
C:\Users\Username>cd C:\xampp\htdocs\magento2
C:\xampp\htdocs\magento2>
php bin/magento setup:install --base-url="http://yourname.magento.com/" --db-host="localhost" --db-name="magento2" --db-user="root" --db-password="" --admin-firstname="admin" --admin-lastname="admin" --admin-email="user@example.com" --admin-user="admin" --admin-password="Admin@123456" --language="en_US" --currency="USD" --timezone="America/Chicago" --use-rewrites="1" --backend-frontname="admin" --search-engine=elasticsearch7 --elasticsearch-host="localhost" --elasticsearch-port=9200
Replace these values:
- –base-url: your magento 2 installation folder
- –db-name: your database name in step 3
- –db-password: your database password in step 3
Other values are optional, we can change later.
Now if everything is done properly, Composer will start to install Magento 2.
If you get the following error, then follow the given solution below-Error : –
In PatchApplier.php line 170:
Unable to apply data patch Magento\Theme\Setup\Patch\Data\RegisterThemes for module Magento_Theme. Original exception message: Wrong file
In Gd2.php line 72: Wrong file

Solution: –
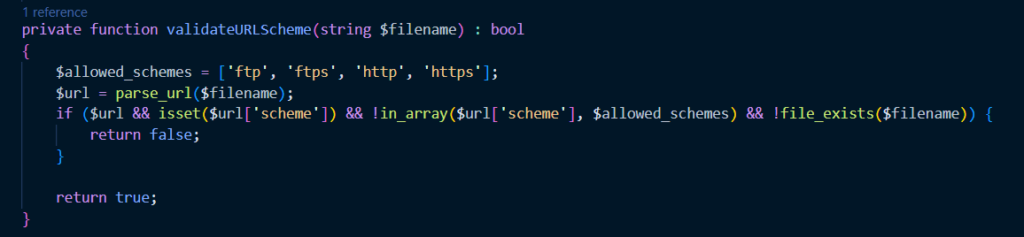
Here Image Adapter try opens to image files (‘open function in Gd2.php line 72). validateURLScheme function return false always because it checking ‘URL’ format but local files not valid for this format, so it returns false.
Find validateURLScheme function in vendor\magento\framework\Image\Adapter\Gd2.php file. at line 94. Replace function with this:
Only change is && !file_exists($filename) text added at line 98.
Save the file and again run the magento2 install command in the command prompt.
And you will get the output as shown below. It means your magento2 installation is successful. Congratulations !!
And you will get the output as shown below. It means your magento2 installation is successful. Congratulations !!

Congratulation, Magento 2.4.2 was successfully installed on localhost.
Now hit the http://yourname.magento.com in the browser to access Magento2 store.
Now if you go to your browser with this URL to access Magento 2 store: http://yourname.magento.com(In my machine, I have setup to http://suraj.magento.com/) .You will probably see a blank page like this

Here’s how to fix this:
Go to: C:\xampp\htdocs\magento2\vendor\magento\framework\View\Element\Template\File
Edit Validator.php using a text editor and find this line:
$realPath = $this->fileDriver->getRealPath($path);
Replace with this code:
$realPath = str_replace('\\', '/', $this->fileDriver->getRealPath($path));
The new file should be like this after editing:

Save this file.
Then, Open up app/etc/di.xml in the editor,
– Find the path “Magento\Framework\App\View\Asset\MaterializationStrategy\Symlink” and replace to “Magento\Framework\App\View\Asset\MaterializationStrategy\Copy”
Save the file.
Next, you will need to run these command to upgrade the database and deploy static view files
php bin/magento indexer:reindex
php bin/magento setup:upgrade
Wait for the process
C:\xampp\htdocs\magento2>php bin/magento setup:static-content:deploy -f
Wait for the process to complete. Once done run below cache command
php bin/magento cache:flush
Then run below command for displaying product images:
php bin/magento catalog:images:resize
Now reload your website and you will see the your new Magento 2 website on localhost.
This is Magento 2 Home page without sample data.
Step 6: Install sample data for Magento 2.4.6
This is Magento 2 Home page with the sample data.

In command interface, issue this command to deploy sample data
php bin/magento sampledata:deploy
Once the process completes, run reindex, deploy static view files and upgrade database commands.
php bin/magento indexer:reindex
php bin/magento setup:upgrade
php bin/magento setup:static-content:deploy -f
Finally flush cache to apply changes
php bin/magento cache:flush
Resize all image
=================
php C:\xampp\htdocs\magento2\bin\magento catalog:images:resize
Well done! refresh your website and enjoy your new Magento 2.4.6 installation with sample data

Admin login :-
Your Admin Url – http://yourname.magento.com/admin/
When logging to admin dashboard with username – admin and password – Admin@123456(which we set in magento install command), you may see this error

To fix this issue, open Magento 2 Command prompt and run this command
php bin\magento module:disable Magento_AdminAdobeImsTwoFactorAuth
php bin/magento module:disable Magento_TwoFactorAuth

This command will disable Magento 2 Two-Factor Authorization so you won’t see the error message in admin panel
Now refresh admin page and you will be able to log in to admin dashboard normally.

Summary
Installing Magento 2.4.6 on localhost is very frustrating and many users may give up because there’re too many issues during installation process. Just follow this tutorial step by step and drop a comment below if you need any help.
You can also reach out to this below video to install magento 2 on localhost Windows using Xampp, Composer.
